
Is the bathroom done yet? Of course not! There’s been lots of stuff going on at the BFPC hovel lately–some of it is super fun (big new project that does not involve my house!!!) and some of it is very boring (accounting final, I’m looking at you), so I’ve been putting off the last part of the bathroom stuff. I’m also very nervous about the last step so it’s possible I’m just making excuses. But last week I was trying to write a long final paper so obviously I got the itch to go to Home Depot and buy some dowels. I LOVE DOWELS, you guys. I don’t know why, but I think to myself at least once a week “do you have enough dowels? Maybe you should run to the hardware store and get some more. Maybe they’ll have the 5/8″ ones back in stock!” It’s super weird but here we are.
So anyway I also needed a towel bar since I took down the shitty rusted chrome one that had been over the toilet. (The brackets are still up there because they have been CEMENTED IN PLACE because of course they have.) I also wanted a shelf to display plants because plants are the only thing I know how to decorate with, so this little dude was born. It’s super simple but I’m a little obsessed with it and feel like everyone should have one in their lives.

Supplies:
- 2 lengths of 1×6 poplar boards in whatever size you want–the hardware store will cut them for you (I got poplar because it’s much prettier than pine, and buying it by the foot is actually cheaper than buying an 8′ pine board)
- 1″ diameter dowel, 4″ shorter than your shelf length
- Kreg pocket hole jig (seems expensive for a piece of plastic, but omg so useful!)
- (6) 1-1/4″ Kreg screws
- (2) 3/4″ regular wood screws with washers that fit
- at least 2 bar clamps (seriously, bar clamps are so great. I use them constantly for all kinds of things.)
- 320 or 400 grit sandpaper (3M Pro Grade Precision is a little more expensive than other sandpaper, but it is the best sandpaper in the world and I will fight anyone who says otherwise.)
- leather strip (if you go with another color, get at least 50 inches–I had hardly any left over)
- some sort of heavy duty(ish) picture hanging things OR a scrap of thin plywood and a circular saw to make a French cleat, which sounds fancy but is not
- a tube of E6000 glue (fun fact: it is now illegal to make an internet craft tutorial that does not include a tube of E6000 glue)
- super sharp craft knife

Your shelf can obviously be any size you want, but these are the measurements I used for mine!
Step 1:
Sand the boards and the dowel so they are super smooth. If you spend enough time on this step you can totally skip clear coating the boards with poly, since they’ll look super nice all by themselves.
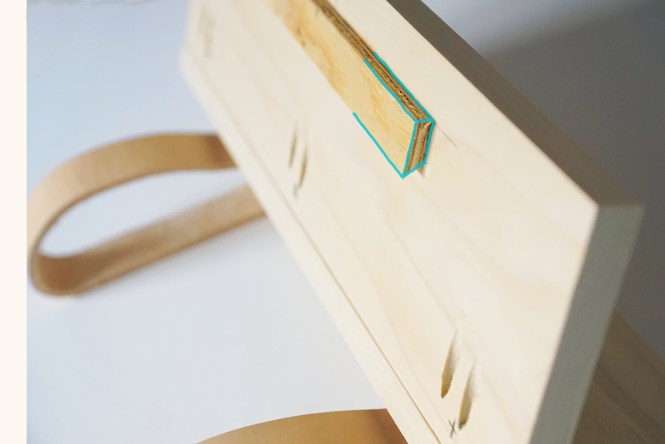
Step 2
Attach the boards to each other. First, three equally spaced places on the back of one board (or don’t, I don’t know why I didn’t just eyeball it). This will be the vertical board.

Then clamp the Kreg jig to the edge of the board (make sure it’s super tight!) and drill two holes at every mark.

Clamp the shelves down to your work surface, and screw them together using the fancy screws and the driver bit that came with the jig. 
The Kreg jig is magic, guys. (Pocket hole tip: make sure when you drill into a board that the screw will be coming out the edge of the board and into the face of the board it’s attaching to, and not the other way around.)
Optional Step 3:
French cleats! I hate fiddling with wall hangers so this is a quick and easy way to avoid that. Just grab ~2″x12″ scrap of 1/2″ plywood (or whatever kind of wood you find in the Home Depot junk bucket next to the chop saw) and zip down the middle of it with your circular saw blade set at 45 degrees.

The piece on the right side is the one that gets attached to the back of the shelf, and the piece in the right goes on the wall. Here’s an illustration I found on Google of how it works:


When you screw the shelf piece on, use a ruler or something to make sure it’s perfectly straight, otherwise hanging it will be a nightmare.
If you’re having trouble with the orientation for the plywood, here’s this:
Step 4:
Leather stuff! 
First up is wrapping leather around the dowel. I chose super thick leather because it looks nicer, but it made this part way more annoying that necessary.
I had the genius idea to use math to determine how long to cut the end pieces, and math TOTALLY FAILED ME. I dutifully punched the equation for the circumference of a circle into my calculator, 2π(.5) in this case, which returned an answer of 3.14 and reminded me that I am a total idiot, so I cut a 3-1/8″ strip of leather off and it was WAY TOO SHORT. Can someone please explain this to me? I measured like 85 times and shouted “It’s 2 pi R, James! Why isn’t it 2 pi R?” at my boyfriend a few times and then just gave up trying to figure it out. It needed to be 4″ long, for whatever universe-bending reason.
Once you have your properly-but inexplicably sized pieces of leather, put some E6000 glue on them and wrap them around the ends of the dowel. They’re going to be too stiff to stay by themselves, so clamp everything to the table until the glue dries. (I gave it about 12 hours, which was a little risky. 24 hours is ideal but honestly who has that kind of patience?) I was a little worried about my clamps accidentally getting glued to the piece so I stuck a piece of plastic wrap in between them.

To make the straps, take the rest of the leather strip and cut it into two equal pieces. Then glue the pieces into loops, with the ends overlapping about an inch. To make things easier, I also used clamps to hold the ends together for a little while, but only for an hour or so until the glue set. Once it feels like they’re moderately firmly attached, use a tiny drill bit to drill a hole through the overlapping part.

Then grab two 3/4″ screws, slip on the washers, and screw the straps down into the bottom of the shelf. (Check out the diagram up at the top for placement.)

Then just slip the dowel through the loops, hang it up on the wall, pop over to CVS and get a random cactus arrangement they for some reason have in stock, and ta-da! You now have the cutest towel shelf in the history of towel shelves!

Quick life note: next Wednesday is my last day of class for a while and a few new work gigs are about to slightly improve my finances, so hopefully I’ll be able to ramp up the posting schedule. I’ve had a post about pretentious furniture snobbery in the world for foreverrrrrr but I just haven’t had the energy to work up the righteous anger that this subject deserves. Summer’s almost here, though, and for the first time in a while I feel like good things might be afoot?


1 comment
Ooh I know I know! It’s because your leather is so crazy thick. If your leather was infinitely thin, then a 3.14″ strip would have worked perfectly. But your leather looks like it’s at least an 1/8″ thick, which essentially adds to your radius. So 2*pi(0.5 + 0.125) = 3.92″. Check your side view photo of clamping the leather to visualize the two different circumferences – the dowel rod alone is 3.14″, but with the leather added it’s much bigger. The difference depends on how thick the leather is!
Cute project – it inspires me to finish a tray I started making but abandoned when I couldn’t think of a good way to attach the leather handles securely.